Combine CoreData and SwiftUI
See how to use CoreData database with SwiftUI. Syncing changes from CoreData to every View of your app.
• 5 min read
Recently I had to build an app using SwiftUI and CoreData.
I thought CoreData was used almost as you would use it with UIKit, but apparently there are some differences.
This guide is intended as a summary of my experience using CoreData combined with SwiftUI. If I will find other aspects, I will add them to this guide.
So, without further ado, let's begin.
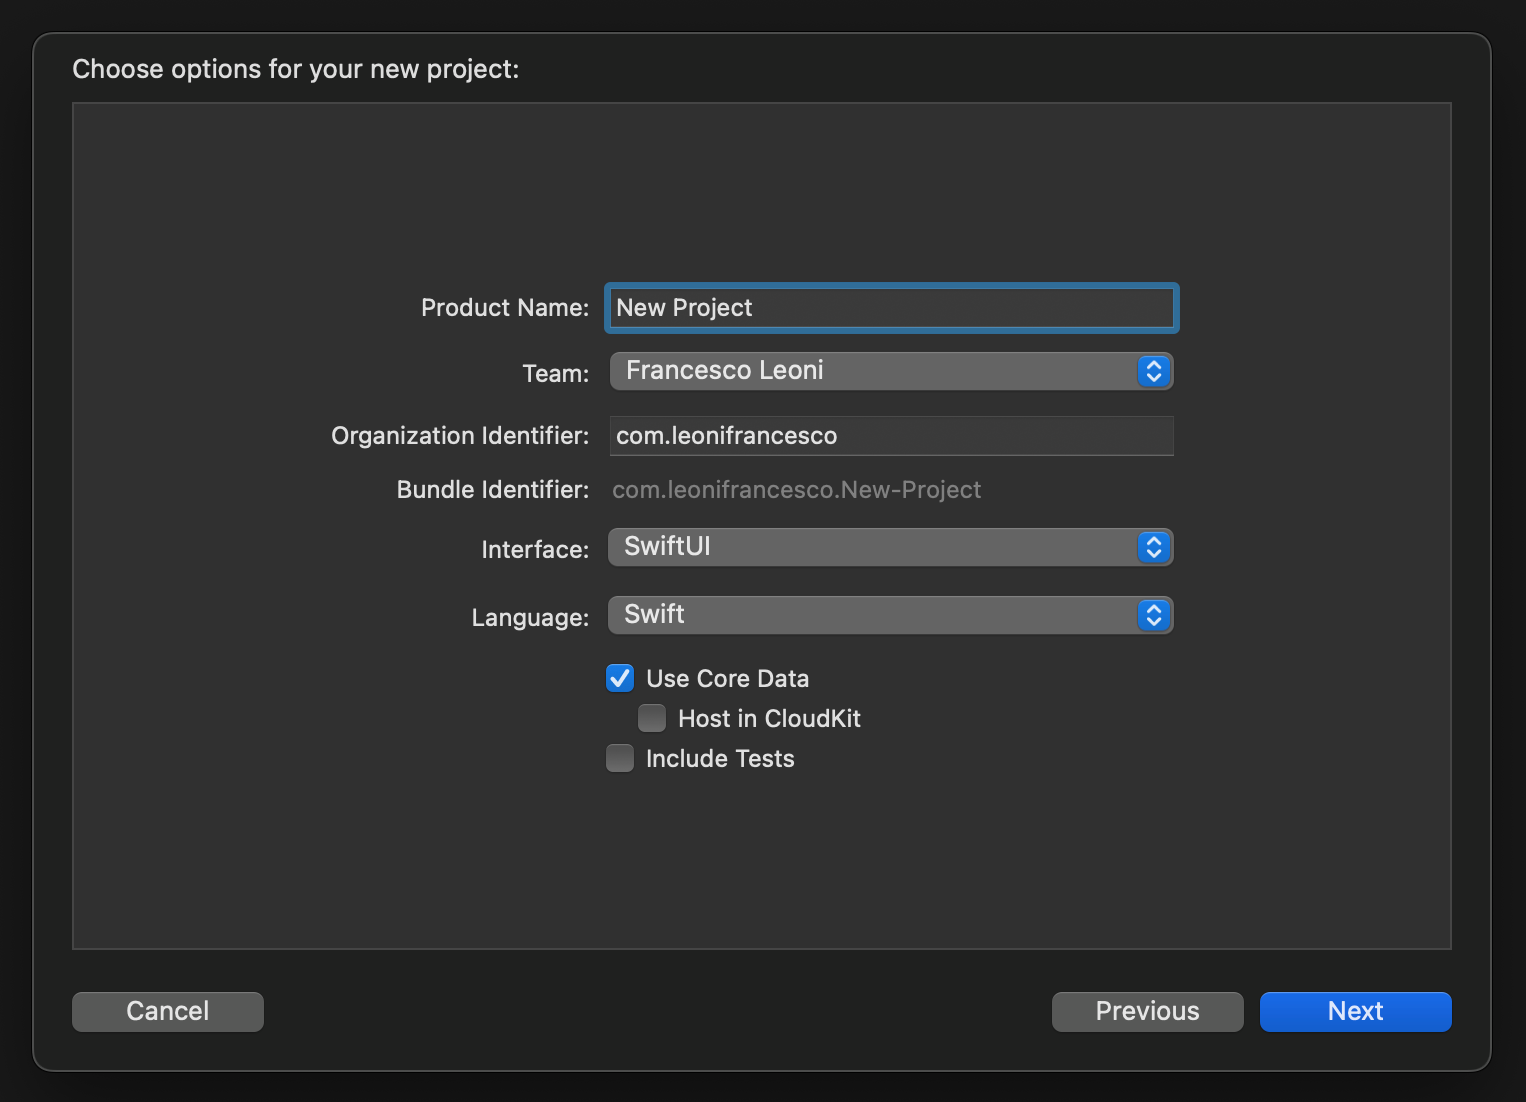
Set-up
This is a pretty straightforward part.
- If you start a new project you can check the 'Use Core Data' option and 'Host in CloudKit' if you want to save your users data to the cloud. In this case XCode will take care of setting up the project for you. (For the CloudKit part will need to do some extra steps).
- If you have already a project you'll need to create a Persistence.swift file and a swift file where you initialise the CoreData stack. (You can even create a new project following the previous step, and copy the Persistence.swift file generated by XCode to your project.
Setup the @main app
Now that you have your project, to be able to use CoreData within your Views, you need to pass the managedObjectContext down you view hierarchy.
Usually this is done in your (AppName)App.swift file.
@main
struct ExampleApp: App {

  let persistenceController = PersistenceController.shared

  var body: some Scene {
    WindowGroup {
      ContentView()
        .environmentObject(persistenceController)
        .environment(\\.managedObjectContext, persistenceController.container.viewContext)
    }
  }
}
Personally I pass, as an .environmentObject, the PersistenceController itself. Because I like to keep all the CRUD logic inside that struct, but that's up to you. If you want to do so you need to make your PersistenceController struct conform to
Great, now you're able to create, read, update and delete NSManagedObjects in your Views.
Tip
PersistenceController (here is an exemple) is the struct that XCode generates automatically for you when you start a new project with the 'Use Core Data' option checked.
Operating with CoreData
To operate with CoreData in your View you need to access the NSManagedObjectContext. To do so, you have two options:
- Using the @Environment wrapper in your
Views
@Environment(\\.managedObjectContext) private var viewContext
- Using the @EnvironmentObject wrapper to get your controller, and from it you can access the
viewContextor CRUD methods
@EnvironmentObject private var persistenceController: PersistenceController
Saving the context
You can save the context using the .save() method of NSManagedObjectContext. Before saving the context you can check whether there are some changes, and save it only if they are present.
do {
  if container.viewContext.hasChanges {
    try container.viewContext.save()
  }
} catch {
  print(error)
}
Saving objects
To save a NSManagedObject you first need to instanciate it and than configure its properties. And then save the context.
let note = Note(context: container.viewContext)
note.id = id
note.text = text
note.folder = folder
note.creationDate = Date()
saveContext()
Tip
You can animate this insertion wrapping this code inside the withAnimation function of SwiftUI.
Fetching objects
Now the fetching part, this is where I found the most difficulties. Let's start right away.
To fetch objects in SwiftUI the most convenient way of doing it is using the @FetchRequest or @SectionedFetchRequest wrappers, in every single View you need to read from CoreData.
Warning
Passing fetched objects between Views will break the automatic updates in case you add, edit or delete objects. (If you know a way to pass fetch objects without breaking the updates let me know and I will update this guide)
So you need to add a @FetchRequest in every View you need CoreData objects and automatic updates. I know it is a bit annoying but it will be worth it.
So, with that said the code is the following:
@FetchRequest(entity: Object.entity(),
              sortDescriptors: [NSSortDescriptor],
              predicate: NSPredicate,
              animation: .default)
var objects: FetchedResults<Object>
Or, if you want your objects grouped by a property:
@SectionedFetchRequest(entity: Object.entity(),
                       sectionIdentifier: \\Object.property,
                       sortDescriptors: [NSSortDescriptor],
                       predicate: NSPredicate,
                       animation: .default)
var sections: SectionedFetchResults<YourSectionType, Object>
To use these sections you just pass them to a List or ForEach, and then to another ForEach.
List(sections) { section in
  Section(section.id) {
    ForEach(section) { object in
      // Configure your view with the object
    }
  }
}
Tip
If you use @SectionedFetchRequest with sorting you may need to specify two sort descriptor. The first will sort the sections and the second one will take care of the objects inside each section. This feature is really useful and requires very little effort.
Using @FetchRequest or @SectionedFetchRequest wherever you add, update or delete an object, the views are automatically updated.
Now, if you need to use a @FetchRequest with a NSPredicate that has a parameter passed from the parent View, I found that the next option works wonderfully.
@FetchRequest
var objects: FetchedResults<Object>

init(id: ID) {
  _objects = FetchRequest<Object>(predicate: NSPredicate(format: "id == %@", id))
}
This way you can pass your parameter in the init and use it to filter your results while keeping the automatic updates. The same goes for @SectionedFetchRequest.
Updating objects
To update a NSManagedObject you will need to have the NSManagedObject to update, fetched as described before and update its properties. And then save the context.
note.text = newText
note.folder = newFolder
saveContext()
Deleting objects
To delete a NSManagedObject you will need to have the NSManagedObject to update, fetched as described before and delete it.
viewContext.delete(object)
I didn't explained every single CRUD method of CoreData like batch insertion and deletion since this guide is focused on the interaction between CoreData and SwiftUI. Every NSManagedObjectContext method, background context, performAndAwait, … behaves exactly like it does with UIKit.
Conclusion
That's all I have discovered so far about CoreData used with SwiftUI. This guide will be constantly updated.
If you want to suggest a better way of doing something, leave a comment and I will update this guide with the best option.
I hope I helped you with you journey with SwiftUI and iOS development.
If you have any question about this article, feel free to email me or tweet me @franceleonidev and share your opinion.
Thank you for reading and see you in the next article!
Share this article